Homemade Cherry Pie Filling
No more canned pie filling! Learn how to make homemade cherry pie filling from scratch using fresh sour cherries. Use it to make cherry pie, cherry cobbler, stuffed cupcakes, and more!
Sometimes I can be really overambitious in the kitchen. I went through a phase where I insisted on making everything from scratch, even condiments and tortillas.
As I grew up and started working full time, I realized how limited my time and energy were. I gave myself permission to buy a few of these items to help with kitchen prep.
However, that part of me hasn’t died; I still find myself wanting to make everything from scratch, especially desserts. If it comes in a package or a mix, I make it homemade.
One of the easiest ingredients you can make from scratch is canned pie filling, such as my apple pie filling, blueberry pie filling, and peach pie filling.
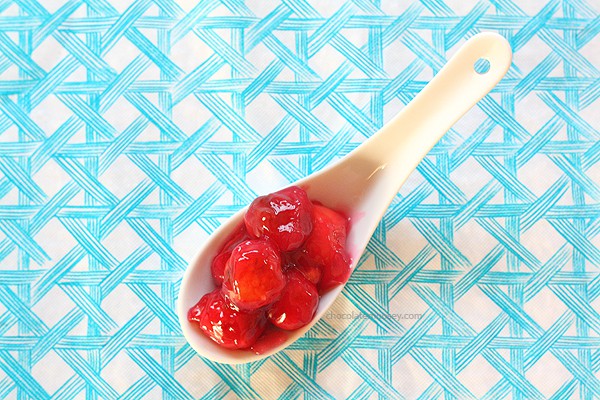
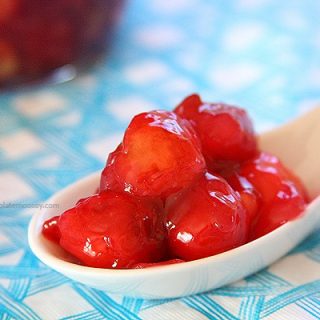
Today I’m bringing you the best Cherry Pie Filling made from scratch using sour cherries (also known as tart cherries) without corn syrup or preservatives.
I personally don’t care about those last two items, but I know others do. Whatever you believe, this homemade cherry pie filling recipe is easy and delicious.
In fact, it’ll take you longer to pit the tart cherries than to actually cook the filling. How easy is that?!
Use it to make Cherry Crumble Pie, a 6 inch cheesecake topping, 7 inch cheesecake recipe, Cherry Cheesecake Stuffed Cupcakes, and more!
Don’t have sour cherries? No worries! I explain how you can easily substitute sweet cherries for pie.
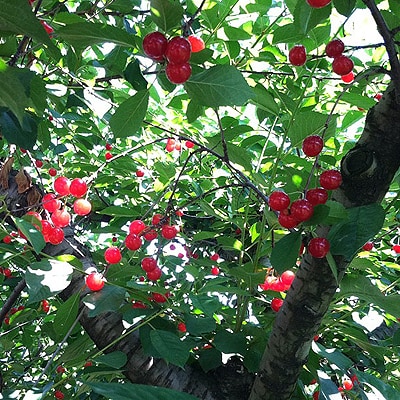
Where To Buy Sour Cherries
Here in Pennsylvania, we have cherry farms. Most of the time I’ll pick my own, but sometimes the farms will sell them already harvested.
I first went cherry picking in 2012. The sweet cherry crops were hit badly from the frost, but the tart cherries were fine. I ended up picking 6.81 pounds.
As the name suggests, tart cherries are sour and hard to eat as a snack. However, they are ideal for baking because the sugar balances the tartness.
Can you make cherry pie filling with sweet cherries?
Since tart cherries have a short harvesting window and are hard to find, yes you can substitute sweet cherries for sour cherries.
As the name implies, sour cherries are very tart, so I didn’t add any lemon juice to the filling.
However, if you substitute sweet cherries, you want to add about a tablespoon of lemon juice. This helps balance the sweetness in the filling.
You may also want to cut back on how much sugar you use. I recommend starting at 3/4 cup sugar then adjust from there.
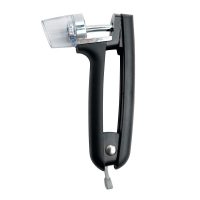
Best Way To Pit Cherries
The easiest way to pit cherries is with a cherry pitter (affiliate link).
I’m not big on unitasker utensils, but if you make a lot of cherry recipes like I do, you’ll want to invest in a pitter. It’s worth the time you’d save.
Plus you can also use it to pit olives.
How To Pit Cherries Without A Cherry Pitter
If you don’t have a cherry pitter, there are several ways to pit cherries with tools you already have on hand:
- Use a pastry tip by placing it tip-side up then push the cherry firmly onto it until the pit comes out.
- Use a chopstick or straw. Insert into the stem side and pop out the pit. If the pit isn’t completely centered, you may have to dig for a bit.
However you pit your cherries, make sure you’re wearing an apron because it will get messy.
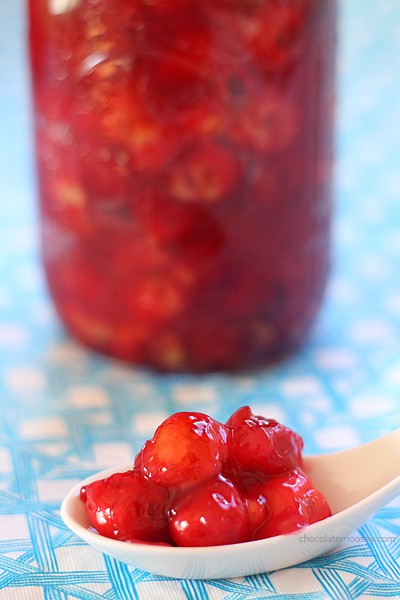
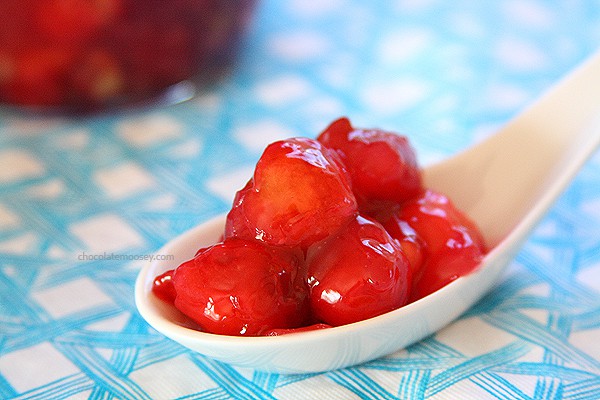
How To Make Cherry Pie Filling
This cherry pie filling recipe is as easy as boiling water, mostly because that’s exactly what you’re doing to make homemade cherry pie filling.
To make fresh cherry pie filling, whisk together water, sugar, and cornstarch in a saucepan then bring to a boil. Once boiling, stir until the sugar dissolves and the mixture thickens from the cornstarch.
Once thickened, remove from the heat then stir in the cherries and almond extract.
Because the cherries are soft (unlike apples, for example), you don’t need to cook it any further. Cool the filling to room temperature before using.
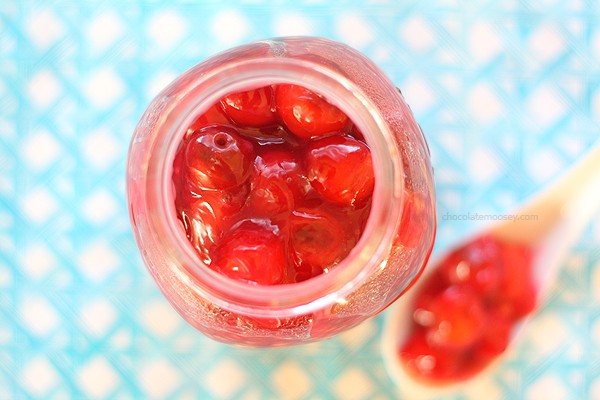
Is homemade cherry pie filling suitable for canning?
I’ve had people ask if my cherry pie filling recipe is suitable for canning.
The answer is no because of the cornstarch. Cornstarch breaks down after awhile, which affects bacteria growth.
Keep this tart cherry pie filling stored in the refrigerator for up to 2 weeks. You can also freeze it for future baking.
Do you need to refrigerate cherry pie filling?
Yes, you need to refrigerate this cherry pie filling recipe.
Once the sour cherry pie filling has cooled to room temperature, place it in a container then refrigerate for up to 2 weeks.
I like to use a large mason jar because plastic may contain odors from previously stored food.
The filling will separate in the refrigerator once cold. When you’re ready to use, transfer it to a saucepan to reheat until smooth again.
How To Freeze Cherry Pie Filling
Using up your fresh cherries but not ready to bake yet? Much like cherry pie itself, you can freeze cherry pie filling.
There are two ways to freeze your filling:
- Line a freezable pie plate (not glass as it may shatter when baked at a cold temperature) with pie dough. Fill with the cherry pie filling then cover the top with another piece of pie dough. Fully cover with plastic wrap then place in a freezer-safe plastic bag.
- Transfer the pie filling to a freezer-safe plastic bag. Place the bag inside an empty pie plate and spread out so it takes the shape of the plate. Freeze until firm. Because it’s the shape of the plate, it should be easy to transfer and bake when ready.
Whichever method you choose, freeze for up to 3 months. When ready to bake, cut three slits into the top of the crust and bake at 400F for 45-60 minutes or until the crust is golden brown.
How To Make Cherry Pie
Now that you have your cherry pie filling, it’s time to bake your cherry pie!
First, preheat your oven to 375F.
Line a 9 inch pie plate with pie dough. Fill it with your cherry pie filling.
Next, take a second piece of pie dough and cover your pie. Seal the edges then make 3 slits into the top to allow steam to escape.
Place your pie on a cookie sheet (to help catch spills) then bake 45 minutes or until golden brown.
Want to make a streusel pie? Check out my recipe for Cherry Crumble Pie.
Want to make a smaller pie? Check out my mini cherry pie for two.
What To Make With Cherry Pie Filling
Now you made a jar of sour cherry pie filling, what should you make with it? Here are some cherry pie filling desserts to make:
- Cherry Cobbler Bars – A different way to eat cherry cobbler
- Cherry Pie Ice Cream – Too hot for pie? Eat it in ice cream form.
- Mini Cheesecakes and No Bake Mini Cheesecakes – Garnish with pie filling on top.
- No Bake Blueberry Cheesecake – For when you need a 9 inch pie
- No Bake Chocolate Cherry Cheesecake Dip – When you don’t want to bake a whole cheesecake
- Baked Cherry Cheesecake Wontons – Finger food that is both fun and messy
- Homemade Apple Turnovers – Swap out the apple filling for cherry.
For the full list of recipes, check out my post on Cherry Pie Filling Desserts.
Homemade Cherry Pie Filling
No more canned pie filling! Learn how to make homemade cherry pie filling from scratch using fresh sour cherries. Use it to make cherry pie, cherry cobbler, and more!
Ingredients
- 1 cup granulated sugar
- 1 cup water
- 1/4 cup cornstarch
- 5 cups pitted sour cherries*
- 1 teaspoon almond or vanilla extract
- 2-3 drops red food coloring (optional)
Instructions
- In a large saucepan, whisk together sugar, water, and cornstarch. Bring to a boil over medium heat, stirring often. Cook until thickened, about 1-2 minutes.
- Remove from the heat and stir in cherries and almond extract. If it's not red enough, add food coloring if desired. Cool to room temperature then use as desired or refrigerate for up to 2 weeks. Recipe is not suitable for canning due to the cornstarch.
The filling will separate when refrigerated. Reheat everything back up in a saucepan until smooth again.
To make a cherry pie:
- Preheat oven to 375F. Add the filling to a prepared 9 inch pie crust (homemade or store bought). Top with another 9 inch pie crust, making slits to let steam escape. Bake 40-45 minutes or until golden brown. Cool completely before serving.
Notes
- *If using sweet cherries, add 1 tablespoon lemon juice.
- In addition to pie, use your filling in mini cherry pie for two, cherry cobbler bars, and cherry crumble pie.
- Liked this recipe? Check out my peach pie filling, blueberry pie filling, and apple pie filling.
Recommended Products
As an Amazon Associate and member of other affiliate programs, I earn from qualifying purchases.
This post may contain affiliate links. As an Amazon Associate and member of other affiliate programs, I earn from qualifying purchase.
Now I just need to get my hands on a bunch of fresh cherries…Oh how I love anything cherry!
You’ll love the fresh cherry taste! Thanks Renee.
WOW!!!
Wait, did you say peaches???
I sure did :D If you click on the link, it even goes to cheesecake ;)
Yum! This is such a great idea. I prefer homemade over canned any day, and don’t even get me started on canned soup- blek!
Glad I’m not the only one! Thanks Jennie!
That pie filling looks so good! It’s picture perfect!
Thanks Angie!
This is so cool I can barely contain my excitement. I must try this. It’s spectacular.
Thank you Kim :)
Can you send me some please so I can make a cherry pie… looks delicious. :D
On its way ;) Thanks Kathia!
I prefer to make most of my own stuff from scratch too (and I am totally with you on canned soup; it’s loathsome). I may have to try making the peach filling.
Gosh, I think that you are my hero… I LOVE cherries and this is just another way I can have them when they’re not in season!
oh that looks sooo good. i love sour cherries! i had cherries like that in wisconsin and fell in love!
I’m just wondering about the thickness of your cherry filling? I tried making some with cornstarch and it didn’t thicken up, something to do with the acidity of the cherries. Have you ever tried tapioca?
Yes, it does thicken with the cornstarch, enough to make a pie (https://www.chocolatemoosey.com/2012/07/31/cinnamon-pecan-cherry-pie/). Not sure about acidity levels. No, I have not tried tapioca as a thickening agent.
can you use sweet cherries for this recipe
Yes you can. You may want to add a splash of lemon juice to balance the sweetness.
I have these cherry trees in my yard. They make beautiful pies. For thickening I use tapioca flour. It freezes better than corn starch, if you make up the pies and freeze them.
Should I use the same amount of tapioca flour as corn starch?
This recipe has not been tested for tapioca flour. You can google “substitute tapioca starch for cornstarch”. Looks like it’s 2 tablespoons tapioca flour for every 1 tablespoon cornstarch, so that would be 1/2 cup tapioca flour. Again, I have not tried this myself so please let me know how it goes.
I have always used cherry pie filling from a can, but I have now moved to Australia where it’s not available and I was wondering what the heck to do! This looks awesome and super easy.Thank you so much – can’t wait to try it on cheesecake and other desserts!
Mmmmmmmmm………these look delicious. I love Cherries and cherry pie. My Nana had a cherry tree in her backyard that we used to pick. Nuthin’ better!
Gorgeous tart cherry pie filling, Carla! Jen (Juanita’s Cocina) just tweeted her Pinterest pin and I followed suit…pinned it everywhere I could! So very pretty. I’ve got tart cherries on the brain…going picking this weekend! Thanks so much for sharing! xo
Perfect timing. I have a pound of fresh cherries on my counter and a hankering to make a pie!
Thank you so much for the recipe. I have a sour cherry tree in my back yard, this year the fruit was quite plentiful and I’m going to try your recipe. :)
I am about to try this with my Nanking cherries, thanks for the recipe! How long do you think it would stay good in the refrigerator? And do you think it would freeze ok? Thanks!
I’d say up to a month in the fridge. And yes, you can freeze it! Maybe not in a glass container. I’ve seen people put pie filling in a freezer bag, lay it in a pie dish (so it takes the shape of it), then freeze it that way.
can this recipe be canned instead of being used right away?
No. The cornstarch will break down. Refrigerate for up to one month.
If you use ClearGel instead of cornstarch, you can both can or freeze your filling without it breaking down. Just a hint
Hi!
I recently picked some dark cherries and I think they are lapin cherries.
My question is: Can I use these cherries to make like cherry pie and stuff with?
Please try to respond Asap if u can.
Yes, you can. You’ll have to adjust the recipe for taste, such as sweetness. Maybe instead of the optional cherry juice, add lemon juice for a little bit of tartness. Again, you’ll have to taste as you go.
Hi!
I put a strainer in a bowl and put my cherries in the stariner and filled the bowl up with water. when I checked on the cherries the next day the has kinda opened up a bit like from the line on them so it is like peeling. can i still use these cherries
I would guess yes.
This looks so pretty and so yummy……………..Oh, Sugar!
I picked and froze many cups of cherries. How do I adjust this recipe to use frozen instead of fresh cherries?
The best way would be to thaw the cherries in a colander, discard any liquid from thawing, then pat them dry.
This is so easy and can be used in so many recipes! I love it.
Happy to hear you enjoyed it!