Kit Kat Cheesecake Brownies
Do you love fudgy brownies? Do you love cream cheese? Now you can have the best of both worlds with these Kit Kat Cheesecake Brownies made from scratch.
What’s fudgy, layered, and cheesecake all over? Would you like to take a break? A break of these Kit Kat Cheesecake Brownies, that is.
Here’s a real sinful treat, enjoyed by both kids and adults alike. There is chocolate. There is candy. And most importantly, there is cheesecake.
Put them altogether in one treat and stand back as people freak out (no, really. My coworkers got super excited when they heard cheesecake and brownie in the same sentence).
I love cheesecake so much that I have a huge category dedicated to it.
Round, square, large, mini, baked, no bake, waterbath, no waterbath, vanilla, chocolate, ice cream, stuffed fruit.
Now I can add brownies to the list.
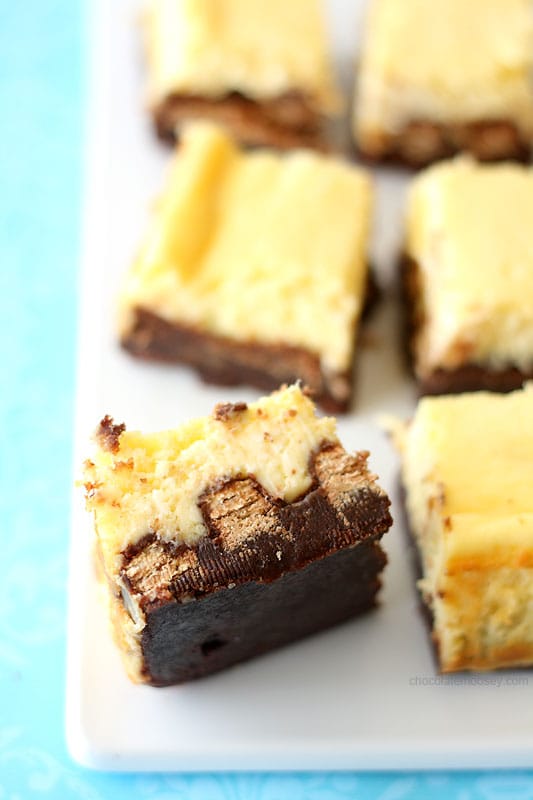
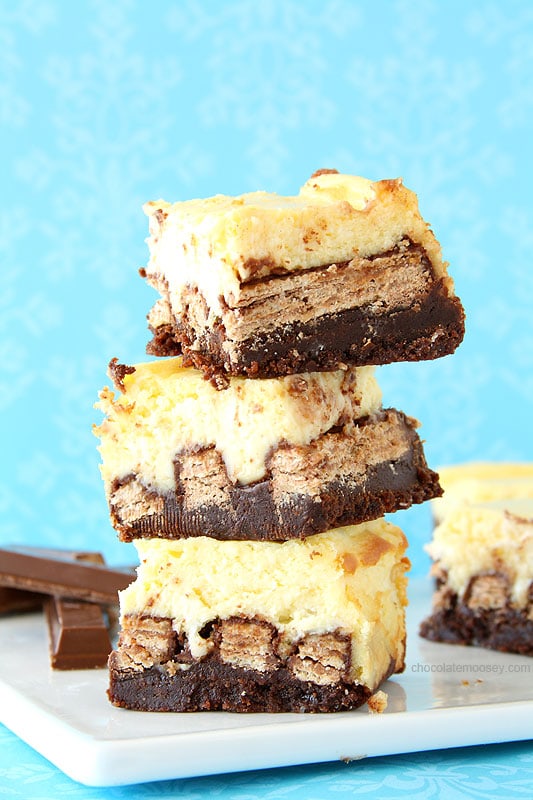
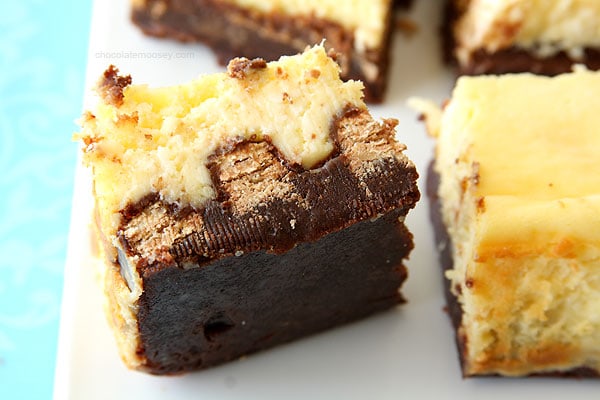
The first layer is a basic fudgy brownie. No cake brownies here.
I thought about baking that layer to firm it up a bit before adding the other layers, but when I realized how thick the batter was, I was able to place the Kit Kats on top without sinking.
I fit 20 Kit Kat wafers no problem (that equals five full-size candy bars. If you use the fun-size bars, they are slightly smaller; therefore, you may be able to fit a few more).
Then I poured the cheesecake filling over top.
These Kit Kat Cheesecake Brownies are a bit messy when you pick them up, which makes them taste even better (ok not really, but roll with me on this).
I will warn you that you may need to let the brownies sit for a bit at room temperature before cutting.
The Kit Kat layer is hard to cut through when it’s straight from the fridge.
Don’t let that stop you though. You can always grab a spoon and dig into the cheesecake layer while you wait.
More Brownie Recipes

Kit Kat Cheesecake Brownies
Do you love fudgy brownies? Do you love cream cheese? Now you can have the best of both worlds with these Kit Kat Cheesecake Brownies made from scratch.
Ingredients
Brownie Layer
- 1/2 cup (4 ounces or 8 tablespoons) unsalted butter, room temperature
- 1 1/2 ounces unsweetened chocolate, chopped
- 1/4 cup unsweetened cocoa powder
- 1 1/4 cup granulated sugar
- 1/4 teaspoon salt
- 1 teaspoon vanilla extract
- 1 egg, room temperature
- 3/4 cup all-purpose flour
- 20 individual Kit Kat wafers (5 regular-sized Kit Kat bars)
Cheesecake Layer
- 16 ounces full-fat cream cheese, softened
- 2/3 cup granulated sugar
- 2 eggs, room temperature
- 1 teaspoon fresh lemon juice
- 1 teaspoon vanilla extract
Instructions
- Brownie Layer: Preheat the oven to 350°F. Line an 8x8 pan with parchment paper.
- In a medium saucepan, melt together the butter and unsweetened chocolate until smooth.
- Remove from the heat and whisk in the cocoa powder, sugar, and salt (the batter will be really thick and grainy – keep going).
- Beat in the vanilla and egg then stir in the flour.
- Transfer the batter into the baking pan and smooth the top with a spatula.
- Gently press the Kit Kat wafers on top of the brownie batter in one layer (you will make 2 rows with 10 wafers each). Set aside while you make the cheesecake layer.
- Cheesecake layer: In a large mixing bowl, beat together the cream cheese and sugar until smooth, about 2-3 minutes.
- Scrape down the bowl then add the eggs one at a time, beating 1 minute after each addition. Beat in the lemon juice and vanilla.
- Transfer the cheesecake batter on top of the Kit Kat layer, smoothing it out. Bake 35-40 minutes or until the top is firm but still wiggles a little bit (a toothpick should come out clean).
Let cool completely to room temperature then refrigerate at least 4 hours or overnight. Let the pan sit at room temperature for 15-30 minutes before cutting. Store in an airtight container in the refrigerator for up to 1 week.
Sources: Adapted from Katie Workman and Taste of Home
This post may contain affiliate links. As an Amazon Associate and member of other affiliate programs, I earn from qualifying purchase.
I’ve been waiting for these beauties to appear!! Wow…my kind of brownie…and totally irresistible!!!!
Pingback: Walnut Crusted Salmon Cakes #SundaySupper — Family Foodie
Pingback: Paneer Tikka Masala #SundaySupper
Yes, I can see why people go crazy over these- YUM!!! Thanks for sharing, Carla… I’ll be making these soon! ;-)
Pingback: Reese's Chocolate Peanut Butter Bundt Cake #SundaySupper - Daily Dish Recipes
Pingback: Homemade {Velveeta} Cheese ~ Cheese, Cake, & Cheesecake #SundaySupper! | Juanita's Cocina
Pingback: Chocolate Covered Cherry Cheesecake Recipe for #SundaySupper
Pingback: Chevre Torte with Mango and Sweet Pepper Salsa for #SundaySupper | Noshing With The Nolands
WTHeck? Where have these been all my life???
Hiding in Pennsylvania.
Oooh this look heavenly!!Love the brownie,kit-kat and cheesecake layers and can imagine how indulgent it must be :)Yumm….
I could not WAIT to see this recipe! They are just gorgeous and look … I want to lick my screen – that’s how they look. haha
Great recipe Carla!
Pingback: Tequila Lime Cupcakes { 21 and up } for #SundaySupper | Mama.Mommy.Mom.
Pingback: Buffalo Cream Cheese Stuffed Chicken recipe
There is something about a brownie base that just makes cheese cake taste better. Yum. :)
Absolutely the kind of cheesecake brownie people go nuts for! And so well deserved Carla. They are stunning!
Pingback: Creamy Meyer Lemon Pasta with Homemade Ricotta and Broccoli #SundaySupper - The Girl in the Little Red KitchenThe Girl in the Little Red Kitchen
Pingback: Tiny Turtle Cheesecakes (No Bake) #SundaySupper | Cravings of a Lunatic
Pingback: Peanut Butter Banana Bundt Cake with Chocolate Chips for a #SundaySupper Cheese, Cake and Cheesecake Event | gotta get baked
Oh my gosh, this is so wonderful! I love this recipe!!
Carla, my eyes are rolling into the back of my head. I am seriously having a mini freak out in front of my computer right now because I can’t just reach into my screen and grab a hunk of your brownies. And I’m in the throes of despair because I’m not eating these as we speak. You are a magician in the kitchen. That is all.
Oh my goodness gracious! I love these!
What an awesome combo!!
Pingback: Lox & Cream Cheese Omelet #SundaySupper - Cindy's Recipes and WritingsCindy's Recipes and Writings
Isn’t that the coolest with the Kit Kat right inside, love it!!
This might be the excuse I need to try the new Limited Addition Hazelnut KitKats.
Kit Kats! Brownies! AND cheesecake! Enough said…I already know this tastes magical!
Sinful in deed. This has my name all over it. And grabbing a spoon to dig in the cheesecake layer sounds perfect to me :)
My husband just decided that I am not allowed to make any other treats until we try these out.
Simply brilliant, Carla, delicious
Turning Kit Kat bars in such a glorious dessert is just the perfect excuse to bring some home! :P Oh, my, after reading the whole recipe, I just feel like crying “WHY DIDN’T I READ THIS EARLIER?” (it’s almost 1am and I have to get ready to work at 9am)
When I read this title I said, “Carla no, you didn’t put Kit Kats in those?” but yeah you did! Looks so good!
Okay lady these are spectacular. I cannot even get over how gorgeous they are.
Pingback: Mocha Cheesecake | Lovely Pantry
I’m freaking out over here! These look amazeballs delicious!
ayayay, what a tease carla! =P They look wonderful and greats shots btw!
Just genius, Carla. Just genius.
Thanks!
I am totally would about messy food tasting better. These look awesome!
Ok, so I’m kinda a brownie fiend and cheesecake has a very special (read: HUGE) place in my heart… then your put Kit Kat in there?!? You are some kind of evil genius and I love you. Holy Yum!
These look so amazing, I would crush about 4 right now. Fab.
Brownie. Candy. Cheesecake. I am dying over these!!! They look incredible and have me wanting this for breakfast instead of my cereal!
I wish I had a huge plate of these right now! I always love your dessert creations!
Carla I’m going to find you a job down here in Florida so you can prepare these desserts all the time for Isabel and I! This seriously looks so good. Maybe make a batch before the conference? ;)
This is the best cheesecake I’ve ever seen – what a lovely combo and ingredients. Thankfully I still have kit kat leftovers, so this is next!
This makes my mouth water in an insane fashion. I love every single layer!
Pingback: Lunatic Loves | March 6 | Cravings of a Lunatic
Pingback: Crepes with Strawberry Mascarpone Cream #Healthy
Your pan measurements of 8 x 8. Is that in centimetres or inches? I’m in Australia, either way, I can convert the measurements
One of my twins loves brownies, the other loves cheesecake, we all love candy, it is setting right now. Hope it becomes a family favourite as it was so easy to whip together.
Inches. Enjoy!
Pingback: Almond Polenta Cake — Shockingly Delicious
Your Cheesecake brownies look fabulous.
Pingback: Saag Paneer ! Golden Ricotta In Savory Spinach Sauce #SundaySupper - SUE'S NUTRITION BUZZ
Pingback: Cheeseburger Soup | Dinners, Dishes, and Desserts | Dinners, Dishes, and Desserts
Pingback: 80 Cheesecake Recipes - Something Swanky
Pingback: Kit Kat Cheesecake Brownies | lawstudentscookbook
Making these exactly as the recipe says. Not cheating this one lol. These will be on the weekend agenda.
i would like to know the texture of the cheesecake? is it thick and soft? light and fluffy?
I’d say thick and soft.
Carla,
I made this and for some reason the kit kat was really hard after I had chilled it. Did I do something wrong?
Are you talking about cutting it immediately out of the fridge? I addressed that in my post with “I will warn you that you may need to let the brownies sit for a bit at room temperature before cutting. The Kit Kat layer is hard to cut through when it’s straight from the fridge.”
If you did let it sit and it’s still too hard, I’m not sure without being there. Maybe you overbaked it? I’d check your oven temperature with a thermometer.
Hope that helps!
how many would u say this serves
It makes 16 brownies if you cut them 4×4. There’s no set answer on how many people it’ll serve, but if one person eats two brownies, then I’d say 8 servings. If you limit each person to one brownie, then it’ll make 16 servings.
2×2 will make 16 in an 8″ pan and they are very small. I usually get 9 servings out of a 8 x 8 pan.
You can cut them into however many pieces you’d like! If you want them bigger, cut them into 9 servings. If you want them smaller, cut them into 16 servings.
Instead of making the brownies from scratch can we make them from a box?
I never made this recipe with a boxed mix, but I don’t see why not! Just make sure you adjust for an 8×8 pan (or double the recipe for a 13×9 pan)
The best recipe i ever tasted and thank you king
Glad you enjoyed the recipe!