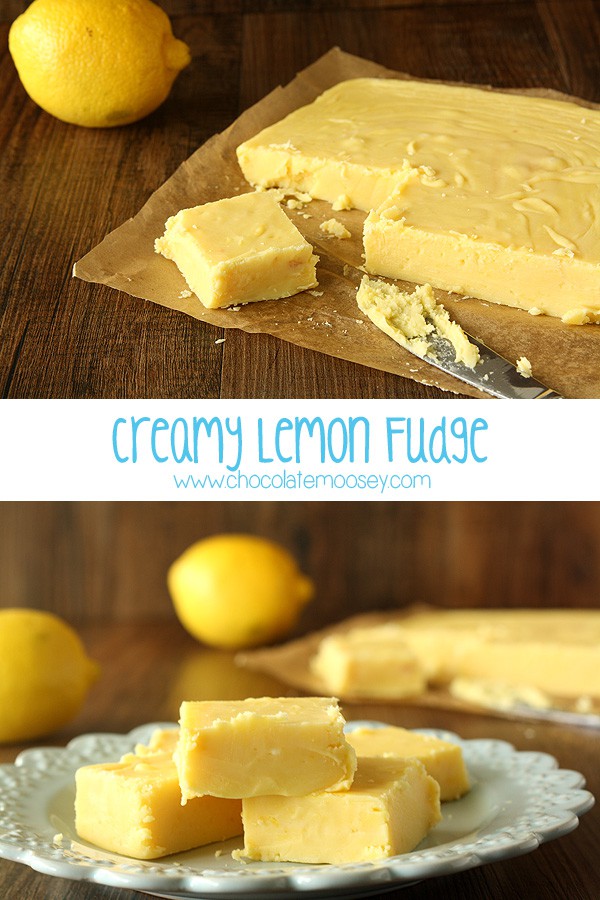
Lemon Fudge
Learn how to make real traditional fudge with this creamy Lemon Fudge made in a loaf pan! It’s a sweet and tangy flavor in every bite!
Fudge. Real, homemade, use a candy thermometer fudge.
I finally did it!
Usually I end up cheating and let the ingredients make the fudge (like my chocolate marshmallow fudge) but this time, I finally conquered the technique.
I made Lemon Fudge made with real lemons. No lemon extract required!
Real, traditional fudge is made by boiling together milk and sugar until the temperature reaches 235-240F, which is known as the soft ball stage in candy making.
This ensures the fudge sets up and becomes firm after cooling.
Then you stir in your flavorings before transferring to a loaf pan to harden into candy.
It isn’t hard to do; really it comes down to patience and an accurate cooking thermometer.
As long as you follow my directions, you will soon have Small Batch Creamy Lemon Fudge to eat!

Fudge has always been a huge enemy of mine.
I remember years ago I wanted to make pumpkin fudge. Little did I know what I was getting into to, I found a recipe and made it.
After it cooled, I cried. It barely set and could only have been eaten by a spoon.
That’s when I learned how precise fudge making is. That bringing it to a rolling boil wasn’t enough; it had to reach at least 234 degrees on a candy thermometer.
You also don’t stir the fudge once it’s boiling; otherwise, sugar crystals will reform. This is why fudge can often have a gritty texture because the sugar recrystalized.
And even if you do reach 234 degrees, factors you can’t control such as the weather can make or break your recipe.

I was so nervous in making lemon fudge.
What if I did all that work and it failed yet again?
After I poured the mixture into my pan, I anxiously checked on it often as it cooled. Slowly, it started to harden. The fudge was turning into, well, fudge!
I breathed a sigh of relief as I made a mess cutting it.

I toyed with the idea of making rocky road fudge because it is my mom’s favorite, but with the dreary weather and chilly days ahead, I wanted to brighten it up a bit with some citrus.
The texture is creamy melt-in-your-mouth goodness with a huge tang of lemon flavor, which comes from the zest of real lemons. You definitely don’t need lemon extract (more on that in a bit).
I did add some food coloring to emphasis this is indeed lemon fudge since it’s not naturally bright yellow.
You certainly don’t need food coloring if you’re not worried about presentation. Naturally it comes out a pale yellow.

The original recipe called for lemon extract, but I found most people don’t have this in their pantry, including myself.
You can substitute lemon zest for lemon extract, so I added a lot more than I would typically use.
Do not try to substitute lemon juice because the extra liquid and acidity may prevent the fudge from firming up after cooling.
I also substituted heavy whipping cream for evaporated milk. Sometimes when I’m in the mood to make fudge, I don’t have canned evaporated milk. And if I do, I don’t use the whole can.
However, I almost always have heavy cream on hand, so it was a natural fit.
You definitely need a candy thermometer, preferably with a digital face (I bought this one).
If you are without one, you can test the mixture using the soft ball stage test.
I made a small batch of fudge in a loaf pan because by nature, fudge is almost sickly sweet. That means most people can only eat a small square before the sugar rush hits.
Depending on how big you cut your pieces, you can make anywhere from 12 to 16 squares.
More Fudge Recipes

Small Batch Creamy Lemon Fudge
Learn how to make real traditional fudge with this Small Batch Creamy Lemon Fudge recipe made in a loaf pan. It's a sweet and tangy flavor in every bite!
Ingredients
- 1 cup granulated sugar
- 1/3 cup heavy whipping cream or evaporated milk
- 4 ounces white chocolate, finely chopped
- 1/4 cup butter (2 ounces or 4 tablespoons), cut into 4 tablespoons
- 2 tablespoons lemon zest (roughly 2 lemons)
- 1/4 teaspoon vanilla extract
- Few drops of yellow food coloring (optional)
Instructions
- Line a 9x5 loaf pan with parchment paper. Have all of your mise en place (ingredients) prepped before starting.
- In a large saucepan, whisk together the sugar and cream/milk. Heat over medium-high heat, stirring constantly until it reaches a rolling boil.
- Turn the heat down to medium-low and boil until a candy thermometer reaches 234F degrees, about 5 minutes. Do not stir. If it begins to brown, turn the heat down to low, ensuring it's still at a boil.
- Once the mixture reaches 234F degrees, remove from the heat. Using a rubber spatula, immediately stir in white chocolate, butter, lemon zest, and vanilla until the chocolate and butter are fully melted. The mixture should be thick and smooth. If you want a brighter color, stir in the food coloring.
- Immediately transfer to the pan and spread into an even layer. Let cool until firm, 2 hours at room temperature or 1 hour chilled. Remove from the pan and cut into squares.
Recommended Products
As an Amazon Associate and member of other affiliate programs, I earn from qualifying purchases.

This post may contain affiliate links. As an Amazon Associate and member of other affiliate programs, I earn from qualifying purchase.
I always thought that fudge implied chocolate, Carla! This looks delicious and I have to say, lemon always cheers me up. Good job on conquering your nemesis. :)
Pingback: Ropa Vieja Recipe for #SundaySupper
Pingback: Easy Homemade Bagels with Mimosa Cream Cheese Spread | The Daily Dish Recipes
Nice one. I fell in love with Fudge in my first time in the Foodie Penpals programme, and I’ve always had it around the house since. I’d love to try and make some – I wonder if in small doses it can act as a “limoncello replacement” for kids in the middle of a heavy meal…
Pingback: Donuts: redux for #SundaySupper | kelly bakes
Mmm, yum. I’ve never had lemon fudge before, but I do love me some citrus
Pingback: Belgian Waffles for #SundaySupper - Cindy's Recipes and Writings
Pingback: Braided Challah #SundaySupper - The Girl in the Little Red KitchenThe Girl in the Little Red Kitchen
Pingback: Beef Wellington
Pingback: Sunday Supper
I’m not a huge fudge fan but I think I could get behind a lemon version. Yum! Also, nice background. ;-)
Pingback: Chocolate Meringue Cake (gluten free) #SundaySupper | Dinners, Dishes, and Desserts
Oh my goodness, I love lemon desserts. This looks divine. I thought I would go on a baking break after the holidays, but I may have to make this soon
Pingback: Mushroom Ragout over Creamy Polenta for New Year's Bucket List #SundaySupper | Noshing With The Nolands
Carla
Your lemon fudge looks divine! Fudge is a fickle beast. One Christmas about 10 years ago I made about 6 batches trying to find one that had the texture and taste from a childhood memory. I never did find the right recipe!
Pingback: Divinity ~ Bucket List #SundaySupper! | Juanita's Cocina
Lemon Fudge is on my bucket list too. I’ve made all sorts of chocolate fudges but have never ventured out of my flavor comfort zone. You should probably send me a sample of this, just so I can see if it tastes as wonderful as it sounds ;-)
So interesting! I have never had lemon flavored fudge before, but I definitely would like to try!
Pingback: Deep Fried Polenta with a Spicy Tomato Relish #SundaySupper | Mama.Mommy.Mom.
This fudge looks impossibly creamy, and the lemon makes it so much more interesting, something to cut through all the sweetness. No wonder you had it in your list, it´s simply gorgeous!
Pingback: San Antonio Puffy Tacos for #SundaySupper
Pingback: Mini Classic Key Lime Pies #SundaySupper #BucketList
Pingback: Savory Spinach-Filled Crepe Cake w/Cheddar Sauce #SundaySupper - Webicurean | Webicurean
Well, this is lemon, and you know…
Oh wow. Just wow. You had me at fudge and then I just jumped right in with the lemon! Wow!
Pingback: Julia Child’s Boeuf Bourguignon for #SundaySupperHip Foodie Mom | Hip Foodie Mom
I really should make these after my neighbor just dropped off a bag of lemons from her tree.
Lemon is one of my favorite flavors, so I would LOVE a piece (…or two) of this gorgeous fudge! Cheers to foodie bucket list success!!!!
I have to say that is the prettiest color of fudge I have ever seen. Congratulations on your fudge success. I knew you could do it!
Pingback: 30AEATS » Best Cornbread You Will Ever Eat! #Sunday Supper
I love lemon and fudge and had no idea that lemon fudge existed. But these gorgeous photos have shown me otherwise. I love that the white balance is warm. It reminds me of lemons and sunshine (aka somewhere that is not my freezing apartment!). And much kudos and congrats to you for tackling thermometer fudge–candymaking is super tricky!
You make me wonder how all the places at the a jersey Shore turn out batch after batch everyday so consistently. I love the lemon and white chocolate. So unique!
ooh! now i know what to do next xmas!
I can say I have never had lemon fudge before but I know I would adore it. As always your pictures are great!!
Just made some white chocolate fudge over the weekend & came out good. These look super yummy .. I will try them. Bet family will love them :)
Pingback: Mangoes and ChutneyGreen Chili and Lentil Tamales
Pingback: Homemade Tortillas for #SundaySupper - Supper for a Steal
Pingback: Mocha Macadamia Trifle with Mascarpone Cream | For a Foodie Bucket List #SundaySupper | The Foodie Army Wife
Carla…all I can say is just spectacular!!!! From the recipe to the photography… beautiful!
Pingback: Jamaican Blue Drawers | Lovely Pantry
I’ve eaten a pan of fudge with a spoon on a few occasions – not much to brag about. :) I love the color of this fudge and I’m going to make it for Easter baskets. It looks perfect!
This is so pretty! I have never been very successful with fudge, mine tend to be a bit gritty not the wonderful smooth melt and your mouth goodness that is fudge. Good job!
I haven’t heard of lemon fudge…ever! What a wonderful color.
Pingback: Brioche for a #SundaySupper Bucket List | gotta get baked
Love it! Your fudge looks absolutely perfect. So when can I come over to get the leftovers?
No doubt about it, I’m definitely going to have to make this. My mom loves fudge, and loves lemon-flavored things, but I don’t think she’s ever had lemon fudge before… plus I made some homemade lemon extract last month, so this is the perfect way to use it! :D
I love making candy, but it is always nerve wracking for me! Usually it good but those other times…..well you know! :)
Sounds and looks just too good.. I must make it!
Congrats, Carla. Those fundge look fresh and inviting, especially with lemon in it. Ok, I need to add this on my bucket list.
Double YUM! I have never had lemon fudge but I want to try it now!
Lemon fudge! I must have some. It looks amazing.
Oh, Carla, fudge is way too technical and fussy for me to make at home. Good on ya for conquering this! It looks absolutely perfect – so creamy, luscious and bright. I would totally welcome something refreshing like this right now – it’s so dreary outside, I could use a hit of lemony fudge.
So this year I am determined that I will conquer fudge. And I am going to start with this because my husband’s favourite flavour is lemon and he would be absolutely thrilled if I could master this one.
Wow these are a great idea. My mother loves lemon and fudge but I’d never had the idea to put them together. I’ll have to try this for her upcoming birthday. Thanks for sharing!
oh, I love that you made LEMON fudge!!! Love this!
I’ve never heard of lemon fudge! It sounds fantastic – melt in your mouth wonderfulness!! Love.
I love fudge!! Your version looks great. So glad that you tackled this and beat it!
Cool! I’ve never seen lemon fudge before, but it looks awesome! Great idea to tackle something you’ve never gotten around to. For me it might be a souffle!
WoW! is all I can say Carla! I have never made fudge and I don’t know if I will ever have confidence in my baking skills to try one but this sure looks good! And I can just see the creamyness oozing!
that fudge looks amazing. And you make it sound really simple :D
These look fantastic! Can you store them outside the fridge and what would the shelf life be?
Thank you
Yes you can store it outside of the fridge. The only time I store it in the fridge is when it’s super hot out during the summer and the fudge gets soft. For the shelf life, candy typically lasts longer than most desserts, so best guess is 1-2 weeks if stored properly in an airtight container.
Normally when I make fudge I aim for 114-115°C (237-239°F) and so I was doubtful about only heating to 234°F/112°C. I thought perhaps the chocolate would help it to set more easily, but it didn’t, and so I ended up with a gloopy mess (albeit a delicious one)! I then had to remelt the mixture and dissolve it in some more evaporated milk and heat it to 115°C, before waiting till it cooled to 60°C/140°F before beating it and scraping it out into a tin, wasting a fair amount in the process.
Aside from the issue with the temperature, the recipe is fantastic. I did add a little maple syrup for more flavour and some baking soda to get the mixture to boil up nice and high (my thermometer needs to be submerged a fair amount to get a decent reading).
I’m sorry to hear the fudge didn’t set up correctly for you. Candy making can be a bit fickle because there are external factors we can’t control, such as weather. I would also make sure your thermometer is calibrated correctly. Being a few degrees off would make a huge difference in fudge making.
Thanks for replying! I’m not sure it was the weather – I just had a look at some data online, and the air pressure over here has been pretty much average over the past few days. I don’t think it was my thermometer either; I calibrated it with boiling water a few weeks ago.
No other fudge recipe I’ve seen has asked for anything as low as 112°C. Perhaps it was the type of chocolate I used. Do you heat all your fudge mixtures to this temperature?
It’s not a massive deal though; I still managed to end up with a decent amount of yummy lemon fudge at the end. My sisters and I just had the last few pieces today, as a matter of fact!
Most of my fudge recipes can be made without a candy thermometer due to the ingredients used (known as foolproof fudge). This one is a more traditional recipe because it’s lemon, which is hard to turn into foolproof fudge.
Can I ask what the equivelant weight is for a ‘cup’ or what sized cup you are using??
thanks
The weight varies depending on the item, like the weight of flour would differ from the weight of chocolate chips. The cup sizes are listed in the ingredient list. This is the measuring cup set I use if that helps http://amzn.to/2j1youv
Thanks for your reply Carla, but that link isn’t working for me… I have quite large mugs, so don’t want to get the measurements wrong by putting too much in!! :)
When you say mugs, are you referring to coffee mugs or actual dry ingredient measuring cups? I see you’re from the UK based on your email, so I want to make sure nothing is lost in translation! You may need to copy and paste the link into your browser if it’s not a clickable link. Or you can google “OXO Good Grips 6-Piece Measuring Cup Set”.
A le cruset mug – like a coffee mug – I don’t have a dry ingredient cup… :(
Oh you definitely need dry measuring cups for this. Candy making is a science, so the wrong measurements would result in a failed recipe. I don’t know the weight of each item, so you’ll have to do some research and converting for that.
I could not get the fridge to heat up to 234°. It kept boiling over and I had to turn down the heat. But if I used a larger pan then it wasn’t deep enough for the candy thermometer. Suggestions?
You can set a timer then check on it by tilting the pan to one side until it’s deep enough to stick your thermometer in.
I’ve been searching for a good lemon fudge recipe. I don’t like the easy short cut recipes. I want it to taste like real lemon not just pure sugar. Can this recipes be doubled, with the same results? Thank you so much, Happy New Year.
Yes you should be able to do it in an 8×8 pan.
I wonder, if I infuse the sugar with lemon zest before starting this recipe, would that interfere with the science of this recipe? Or, is it better to add lemon zest before pouring the mixture into the pan? Thank you in advance :)
The recipe tells you exactly when to add the lemon zest (step 4).