Understanding Aperture (A.K.A. How To Make Your Background Blurry)
 from www.chocolatemoosey.com")
One mode I use a ton in food photography is the aperture priority mode, often labeled as Av Mode. Aperture is the reason your background is or isn’t in focus. If used properly, it makes a huge difference because it gives your viewers a focus point. It was also one of the hardest concepts for me to grasp because everything I read was really technical. The Internet needs a non-techie guide, so here I am bringing that to you.
However, there will be *some* technical explanation. Before I scare you off, this is what you need to know: the smaller your f number, the blurrier your background. In other words, if you want to focus on the object in front and blur out the background, use a low f number (very common in food photography). If you want everything to be in focused including the background, use a high f number (very common in landscape photography).
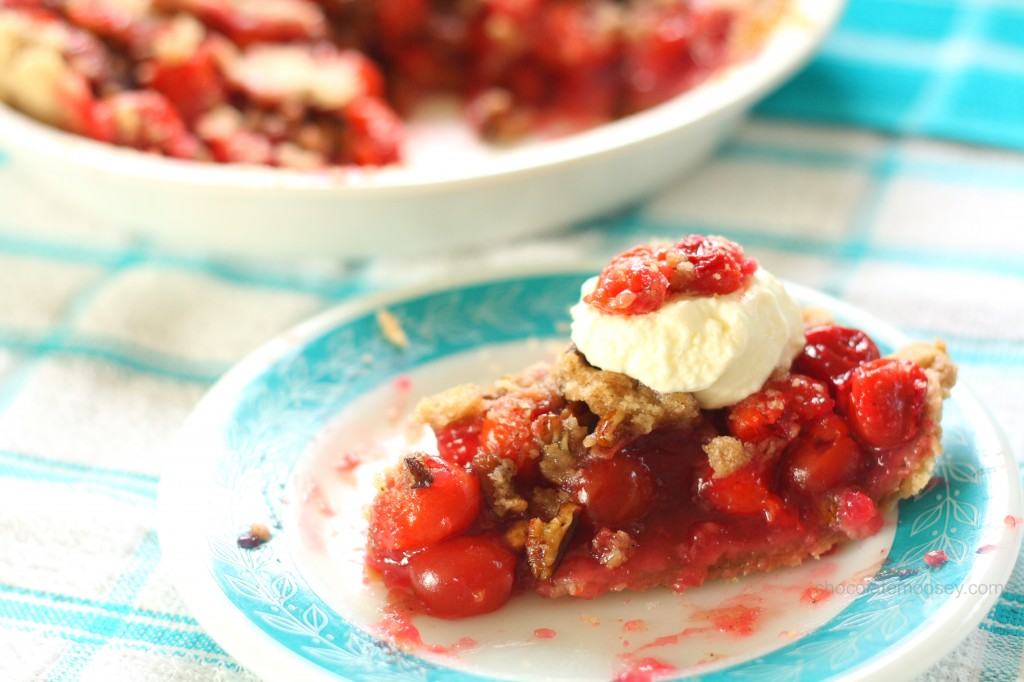
Cinnamon Pecan Cherry Pie – Aperture: f 2.8
What is aperture? The aperture of a camera is the opening in the lens which light travels through. Controlling the size of the aperture controls the amount of light traveling through. You control the size using what your camera refers to as f-stops or f-numbers, which is the letter f followed by a number (f 1.8, f 3.5, f 9.0). The smaller the number, the wider the opening. The wider the opening, the more light travels through (think of it like opening your curtains in the morning – the more you pull back, the more light shining through).
Did you glaze over that last paragraph? It took me years to understand that, mainly because everything I read was too technical. Here, I’ll translate that for you: the smaller your f number, the blurrier your background. You want those cups in the background to be blurry? Low f-number. You want the basket of lemons to have shape but not in focus? Middle f-number. You want me to see your entire ice cream sundae table set-up? High f-number.
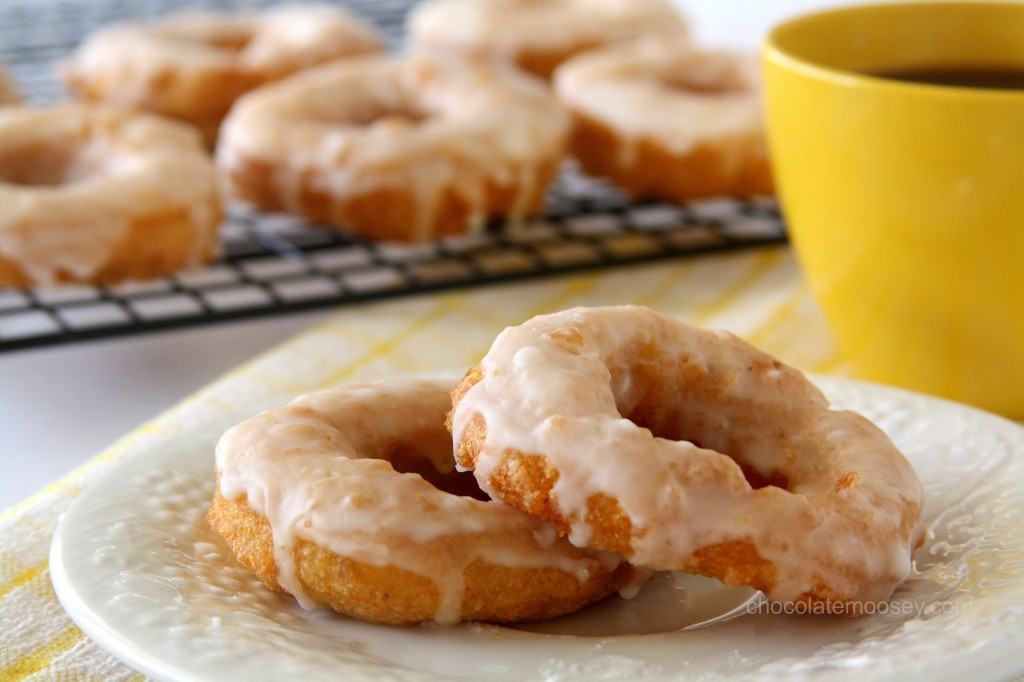
Double Lemon Glazed Doughnuts – Aperture: f 6.3
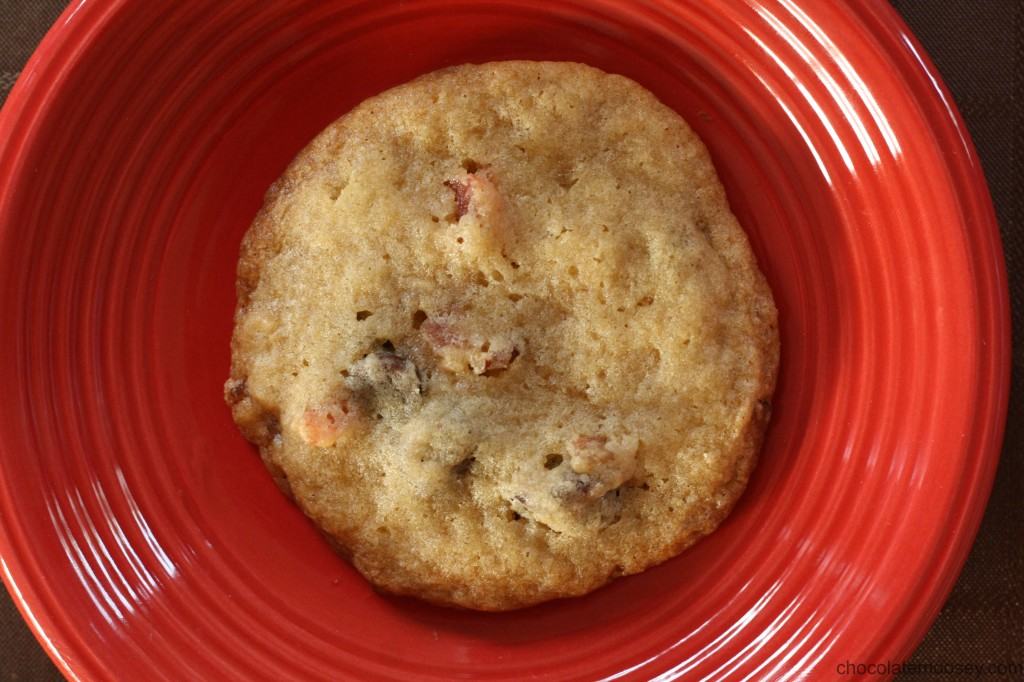
Bacon and Dried Cherry Chocolate Chip Cookie – Aperture: f 5.6
Why should I care about whether my background is in focus? The simple answer is depth of field, which is the distance between the foreground and background of your scene. This means you have something in the front and something in the back. Sometimes it’s really obvious, such as a cup of coffee behind some donuts. Other times it may not be so clear, such as a single cookie on a plate.
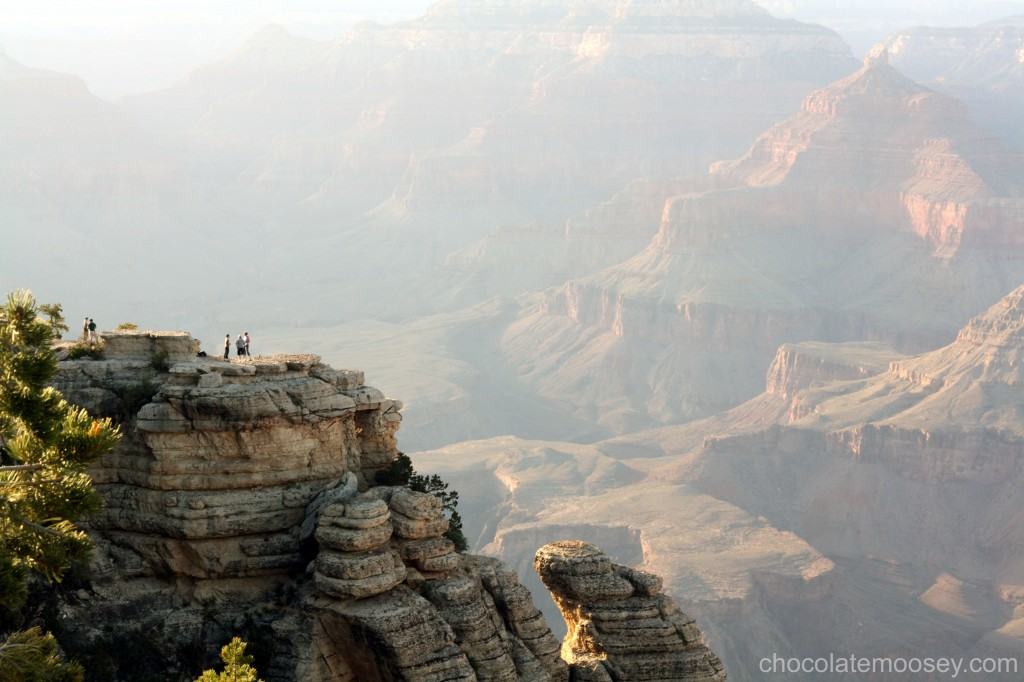
Grand Canyon – Aperture: f 13 (even though the f-number is high, distance between the foreground and background plus high mid-day sun still created some blur)
Depth of field is important because it adds dimension. Distance is the biggest challenge when photographing. When I visited the Grand Canyon, my biggest challenge was portraying how huge and deep it was. The only way I could really accomplish this is to layer my photograph and have a prominent foreground and background. Sometimes I would even have a midground, which is the layer between your foreground and background. My favorite part of adding dimension is using clouds. Clouds add so much more depth, it’s crazy. A beautiful cloudy day is the best picture-taking weather.
 from www.chocolatemoosey.com")
Statue of Liberty – taken on my iPhone (aperture unknown, but look at the clouds!)
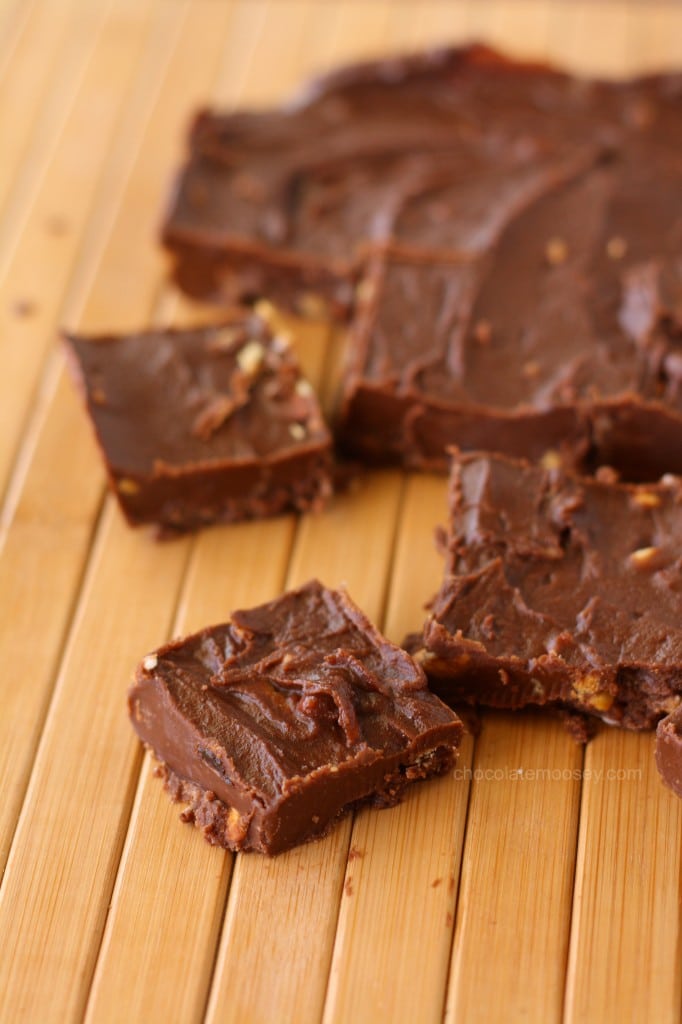
Easy Chocolate Peanut Butter Fudge – Aperture: f 3.2
Another reason to care about your background is to give your viewers a focus point. Sometimes you want objects in the background to emphasize what your photo is about, such as strawberries for strawberry cupcake. However, you want your focus to be on the cupcake, not the strawberries. Other times you may find yourself in a situation where the background is distracting, but you have no control over fixing it. Blurring will help tone that down.
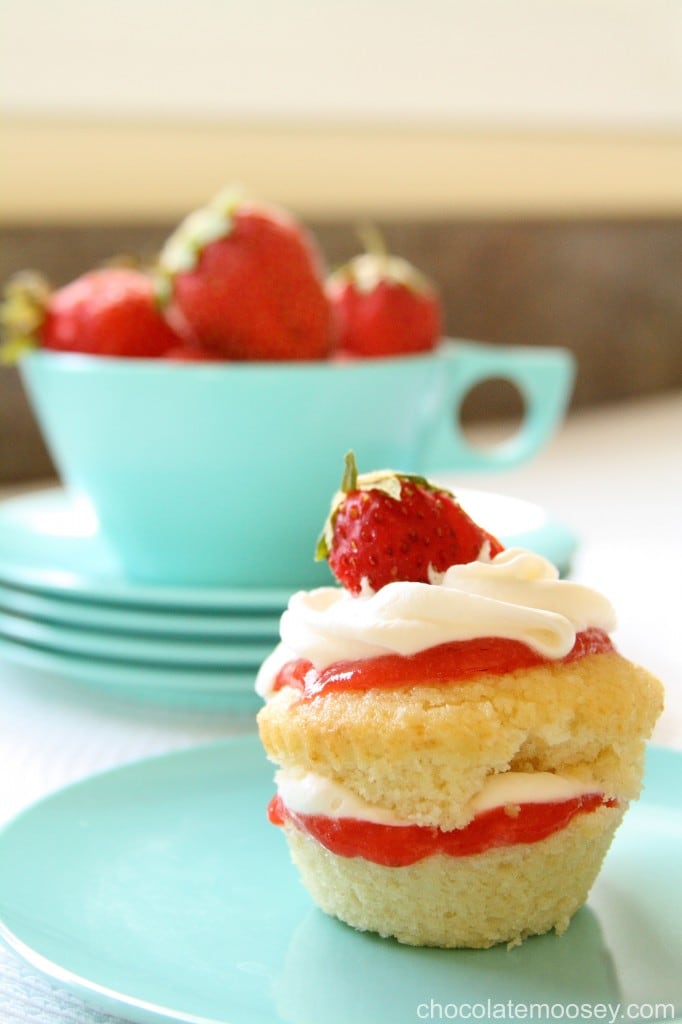
Strawberry Shortcake Cupcake – Aperture: 5.6
How do I adjust the f number? The best way is to refer to your camera’s manual. For my Canon Rebel, I turn a knobbed wheel. If I’m using complete manual mode, I have to hit another button (for me it’s marked Av) before turning the wheel.
 from www.chocolatemoosey.com")
Murray – Aperture: f 1.8
Why can’t I go below a certain f number? F number is actually based on your camera lens, not your camera itself. The number is listed on the lens spec. For example, I have the 50 mm f 1.8 lens. The lowest I can make my f number is 1.8. There is no zoom range, so I can make it f 1.8 no matter where I stand. If I had gotten the 50 mm f 1.4, the lowest would be 1.4. When I use my 28-135 mm f 3.5-5.6 lens, the lowest I can go is f 3.5 when I’m at 28 mm and f 5.6 when I’m at 135 mm. In this case, the lowest the f number can go is dependent on the zoom range.
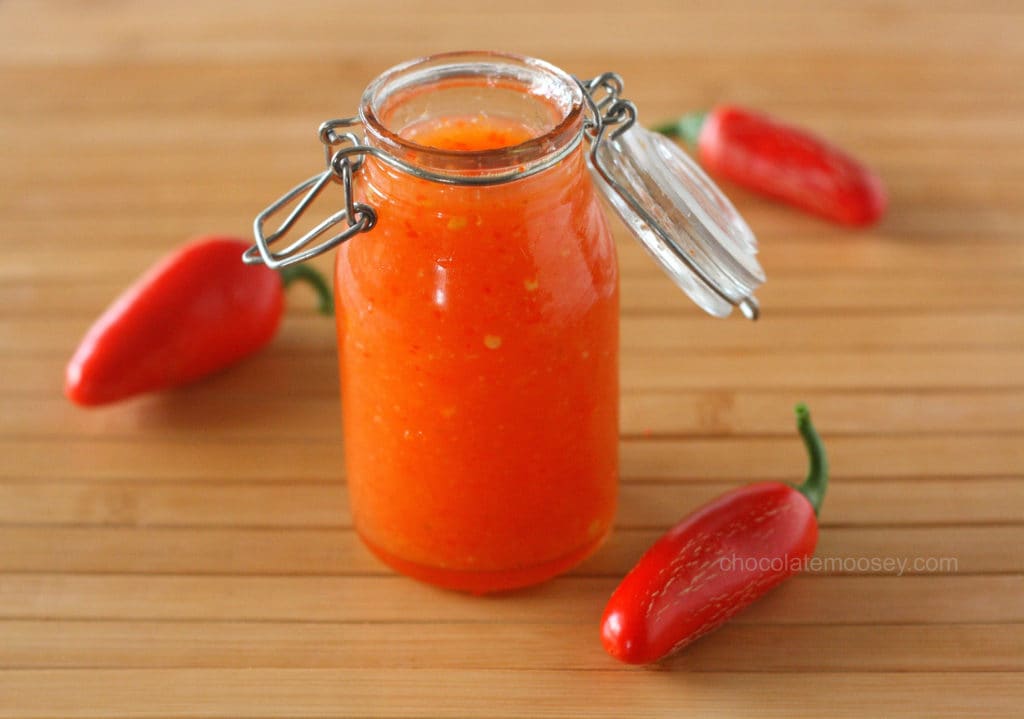
Sweet Chili Sauce – Aperture: f 3.5
Here’s an exercise I did for you with my Peanut Butter-Stuffed Chocolate Cookies. I placed the camera on a tripod and left all of the settings the same except for the f number. You can see as the f number gets higher, the background becomes more focused. Which one looks best to you? There is no right or wrong answer. My personal preference is around f 2.5 – f 4.0. I don’t like my background super duper blurry, so I rarely use f 1.8. However, I don’t like the mid range too much because then it looks like I simply couldn’t focus rather than purposely blurring the background.
 from www.chocolatemoosey.com")
Aperture: f 1.8
 from www.chocolatemoosey.com")
Aperture: f 2.5
 from www.chocolatemoosey.com")
Aperture: 4.0
 from www.chocolatemoosey.com")
Aperture: f 5.6
 from www.chocolatemoosey.com")
Aperture: f 8.0
 from www.chocolatemoosey.com")
Aperture: f 10
I put my f number pretty high and it’s still blurry. Why? In addition to f number, your photograph could be blurry for several other reasons. The main two are lighting and movement. Aperture is connected to shutter speed. Both are dependent on light. If you have low lighting, the shutter speed is slower. Slower means you have to hold it still longer. No matter how careful you are, it’s very difficult to not get camera movement when at a slow shutter speed.
The best solution is a tripod. Spend the extra money and buy a really great one. I am borrowing one at the moment that has a not-so-sturdy lock on the one leg. It also doesn’t have a bubble level. It is so frustrating to use it, but right now that’s all I got.
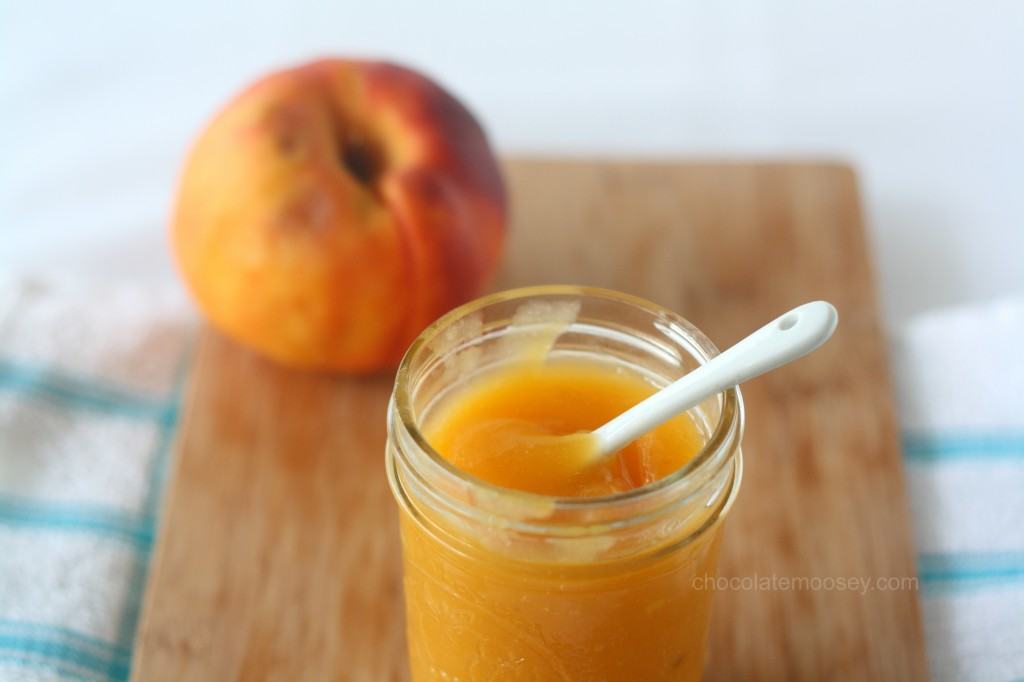
Vegan Peach Curd – Aperture: f 2.8
If you feel like you’re not getting enough blur, try putting more distance between your subjects.
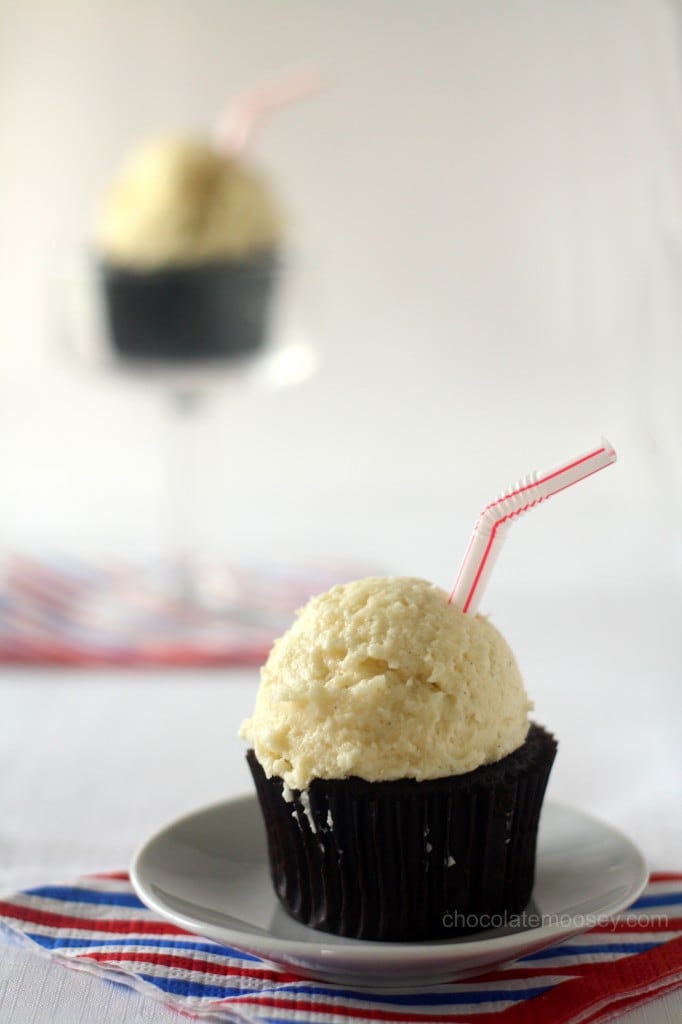
Root Beer Float Cupcakes – Aperture: f 2.5
I hope I was able to explain aperture on a non-techie level. Even if you don’t understand most of what I said, just remember that the smaller your f number, the blurrier the background. Next time you’re shooting, play in Av mode and take shots with different f numbers. See which ones work the best for your style. Know which ones you aren’t crazy about.
If you enjoyed what you read, what other guides would you like to see?
This post may contain affiliate links. As an Amazon Associate and member of other affiliate programs, I earn from qualifying purchase.
As someone with a new dSLR camera, this was great and easy to understand. I agree that everything is so technical! (And I’m a tech person!) Thanks for writing this! I’m excited to see my own photography get better.
Excellent article Carla! You really did a great job of explaining aperture in a way novices can understand (including me).
The kitty cat picture! OH MY GOODNESS! I love this post, thank you!
You made this all so easy to understand. Thanks for breaking it down step by step with the cookie shots–it definitely gives a clearer picture (no pun intended) of how aperture works!
This is a great explanation, thanks Carla! I’ve been experimenting with aperture a lot, myself, too. This is really helpful!
Wonderful explanation!
This is great stuff ! Just what I needed. Not sure how my camera has it etc, but will go home and figure it out ! Please do more posts like this . Very useful :)
Thanks so for explaining this to me. You brought this ancient camera mystery to the light of day.
I finally figured out the AP settings after taking one of the Creative Live classes, but I always like reading about it again. Thanks for another great photography post!
Great article … Thx for sharing :-)
This is GREAT information! Thanks so much for sharing!!
What a fabulous little lesson. I have a point and shoot camera with a few bells and whistles and I’ve never understood them. So, for that I thank you.
This post is excellent. You explain it really well.
Great tutorial! I just recently started playing with the aperture setting and absolutely love it!
I shoot in Aperture mode, but I’ll be honest, I’m still trying to figure it all out! This is most helpful–Thank you!
Carla, I heart you for this post! You’ve just explained something technically complex in English and I totally understand. I’m still saddled with a point & shoot where I cannot control aperture and therefore always have composition problems. Shopping around for a DSLR now so collecting info for when I have it to play with!
Carla: I have a Canon Rebel also, this was very helpful and now I understand what aperture is and what the ‘f’ # means. Looking forward to reading more of your tips. Thank you Joy
So helpful. Thank you
Thanks for the easy to understand instructions. Lovely photos!
Thank you for this, as a brand new DSLR user I need all the help I can get! Pinned for future reference!
thanks for making aperture so SIMPLE to understand! I can’t wait to test it out on my camera! :)
Wow. I found you via a search for Twitter etiquette, but as a foodie who loves photography, I kind of feel like I’ve hit the jackpot with your blog! Can’t wait to check it out and see what else I’ll find! :-)
I own a dslr n Donno how to make use of it efficiently..but sincerely I Wud like to learn n immensely interested in it..was searching fr a good guide n landed here..thanks for these simple points .any other help Wud be greatly appreciated
This is so clear and helpful, thank you! I just got a DSLR camera for Christmas and am determined to learn how to use it this year, and non-technical explanations like this are right up my alley :)
You’re awesome!!! Thank you!!!
Pingback: Nifty Tips: Food Photography Resources for Bloggers | On Sugar Mountain
This has to be the best explanation for aperture I’ve ever come across! I’ve been studying this topic for years and have tried to explain it to my students without success! I see the light now! Thank you!
Pingback: Carla Cardello from the Chocolate Moosey Food Blog | Strawberry Sue - A blog by the Florida Strawberry Growers Association
Great article!!! I am in the process of helping my Mom with her 2 year old Canon SLR and hope to get my own very soon. Thanks for posting! This was very easy to follow and I am excited to put my new knowledge to use.
THank you. I just got a dSLR camera and was overwhelmed by all the conversion charts and technical explanations on F stop settings. What a relief to finally ‘get it’ enough to start taking some photos.
One word for your explanation: AWEEESOOMMMEE!!
Thanks!
OK. Now I completely understand what aperture means.. no looking back.. having bought a new dslr, it couldn’t have been more simpler than this.. love this post
Thank you soooooo, so much!! This is very straightforward and so helpful!! I have a complicated camera that I would love to be able to use as more than a point and shoot. Your information is so easy to understand!! Thank you!!! And, I love baking too so your website is a wonderful find!!
SUCH a great explanation. Literally it took me like four years to get this. Thank you!
Great article! Thank you!
Ok, are you a teacher? Because I have always been so confused with the technical stuff and you seriously summed it up in a way that makes perfect sense!!! My photos look SO much better! Thank you!!!!!!
Awesome explanation. Thank you so much.
I’m the same…can take photos…(have an artist background)…however..the technical aspect is always what i have to study up on…big time…thanks for the article..
Hi, Thank you for the great explanation, have been trying to figure the blurry background thing out for my book photography and there are so many highly technical explanations out there. Amazing food also btw. I know far too well about the struggle of cooking justfor one.
Glad it helped!
I came across your article recently, and it was so helpful for our entry into food styling with my Family & Consumer Sciences classroom. I’m learning right along with the students in how to create effects with photography. Excellent article that my 8th graders understood well!
Oh wonderful! Glad you found it useful.